A long time ago, when the human race started to use ink to inscribe information on parchment or papyrus, this was a great leap forward from carving into stone or clay. Information became easier to create and transport, and knowledge instantly started flowing in ways it had not done before. Today, *all* of us are closely tied with the process of creating, sharing and consuming documents - the world literally revolves around them.
But documents have their constraints of course. Critical data and knowledge gets buried within them, leading to a series of challenges that mean very few organizations truly get value from the content they create. You might be familiar with the statistic from McKinsey research that the average knowledge worker spends 20% of their time (a day per week!) just searching for information or expertise within their company. That could be conservative though - IDC's Knowledge Worker survey (behind paywall) suggests the figure could be closer to 30%.
One of the reasons for this is that documents generally need to be opened to access their information - and it's inherently time-consuming to open 20 documents to establish which one has the information you're looking for. As you might know, Viva Topics and SharePoint Syntex introduce AI-powered capabilities into Microsoft 365 to solve several aspects of the knowledge challenge. In this post, we'll look at SharePoint Syntex, and how to teach it to:
- Automatically recognize different types of documents - usually from some consistent content within the document (e.g. the phrase "Statement of Work")
- This means the document can automatically inherit a retention policy or appear in search results in a certain way (for example), all without a human tagging each document. In Syntex, this is a Classifier
- Pull specific information out of documents - meaning that high-value data is no longer locked inside documents, whether you have 100 or 100 million.
- With this capability, the specific information is pulled out of each document and stored as metadata in SharePoint columns. In Syntex, this is an Extractor
An example in my company
At
Content+Cloud, two of our most common document types are Proposals and Statement Of Work documents - no surprise given that we deliver projects and services. I've redacted the numbers, but here's what the costs/investment table looks like in one of our real SOWs:
I've highlighted a couple of things in the image above. When I'm opening the document to find the total value of the project, as a human my brain is instinctively following this process:
- Find the "Fees and Payment" section
- Look for the "Total" row
- Find the £ value that is in that row
In this article, we'll teach SharePoint Syntex to do the same thing (in addition to recognizing Statement of Work documents in the first place). Syntex can then pull out the project value from 100s or 1000s of our SOWs much faster than any human ever could. Given that we create many SOWs each week, knowing that the technology can stay on top of this unlocks further benefits.
Creating a document understanding model in Syntex
I'm going to skip over the initial pre-requisite step of creating a Content Center in your Microsoft 365 tenant - quite simply, this is done in the SharePoint admin center for your tenant, and "Content Center" appears as a new site type. Once you have that, you can begin creating models. We're going to do two things here:
- Create a Classifier so that SOWs can be identified
- Create an Extractor so that the value can be extracted
In both cases, we follow this process:
To start, navigate to your Content Center and click the "Create a model" button:
Give it a name (in my case it's a
Content+Cloud Statement of Work) and choose whether you want to create a new content type or use an existing one:
Notice that you can also specify a retention label for this model. This is huge step forward in helping organizations meet their compliance needs! Once trained, not only can SharePoint Syntex automatically recognize a Statement of Work within my tenant (regardless of which site or Team is it stored in), it can ensure these documents have appropriate information governance applied. For our company, a Statement of Work is a contractual client document - and as such we should retain it for a number of years by default. Syntex makes this possible without a human needing to label each SoW - and the pattern recognition we'll see provides the power and flexibility to recognise reliably.
In this step I see all of the published retention labels in my tenant:
Now that we've created our model, the first major configuration step is to add some files for training - we can use these to train both the Classifier and the Extractor. The training files should be a set of test files which are Statements of Work, but also at least one which isn't. I supply some files as shown:
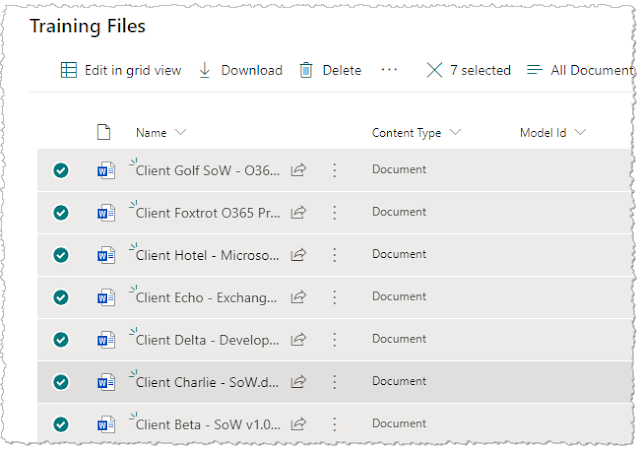
The "Training Files" library is a special document library within the Content Center where these files go. It's common to stack up files from different models you build here (as shown below), but essentially you're adding a set of files you're previously gathered up each time you build a model:
How many training files do I need?
Syntex requires you to add at least 5 files which match the document type you're working with, and at least 1 which isn't. However, the best idea is to gather up and add more than 6 files because you'll use them in two steps:
- Labelling at least 6 files during initial training
- Using the remaining unlabelled files to test your model
Creating the Classifier
Now we have some training files, click the "Train classifier" button:
Creating the Classifier - labelling step
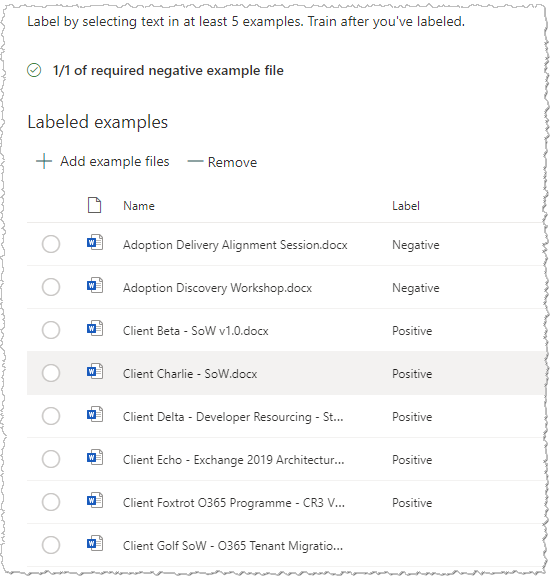
In this step we're on the first tab ("Label") and we're essentially telling Syntex which of those training files are the ones which match the content type (in my case, a C+C Statement of Work) and which are not. Within the labelling tool, the interface provides a toolbar with "Yes" and "No" buttons to do this (highlighted below):
I step through each of my training files and click the "Yes" and "No" buttons appropriately - this is how labelling is done for a Classifier. Once done, the model trains itself automatically and the "Label" column confirms the status:
Creating the Classifier - explanations step
Now move to the "Train" tab. We now need to add one of more "Explanations" - these help the model further, since just having some labelled sample documents isn't enough. Think of this as the system needing to understand more about the patterns that identify this document type.
To start, click the "New" button within the Explanations area - notice that you can start from a blank example or from a template:
Templates, in case you're wondering, are for common snippets of content which may help classify (or you may want to extract from) a document - dates, phone numbers, zip codes, currency amounts, e-mail addresses and so on):
In this case, we can create from blank. What I'm going to do is create a phrase list explanation, using a phrase which is only found in a Statement of Work - when doing this, one thing to look out for is that often you can't use the simple case alone. For example, the phrase "Statement of Work" appears in many of our other documents which aren't actually Statements of Work! So instead, I'm using something from the small print that will only be in a SOW - in the image below, you can see it used as my phrase and also on the right in the simplified document view:
Click "Save" to finish creating the explanation.
Creating the Classifier - training/testing step
Now it's time to test the Classifier. To do this, move to the "Test" tab and click the button to add example files:
I can now select some previously added example files - these need to be files I haven't already used in the labelling process. To test properly, I select some documents which are SOWs and some which aren't:
Click the "Add" button and the files will be used for the testing. What you should see is that the model has correctly identified the documents which are a positive match, and others show as negative:
Excellent!
At this point, the "Classifier" part of our AI model is complete - Syntex will now be able to recognize this type of document anywhere in the Microsoft 365 tenant. The model can now be applied to document libraries and the content type we created or used will be applied:
As any experienced SharePoint or Microsoft 365 practitioner knows, there are SO many possibilities now that the content type is known. From automated workflows, information protection policies, filtering and special appearance in search results through to document lifecycle aspects such as retention and disposition - the list goes on.
But let's not stop there - before we complete the final steps of making this happen, we'll do more than just identify the document type. In the next post, we'll go back to where we started by implementing an "Extractor" in SharePoint Syntex to pull out the Statement of Work value - thus ensuring it's not buried in each document.


No comments:
Post a Comment